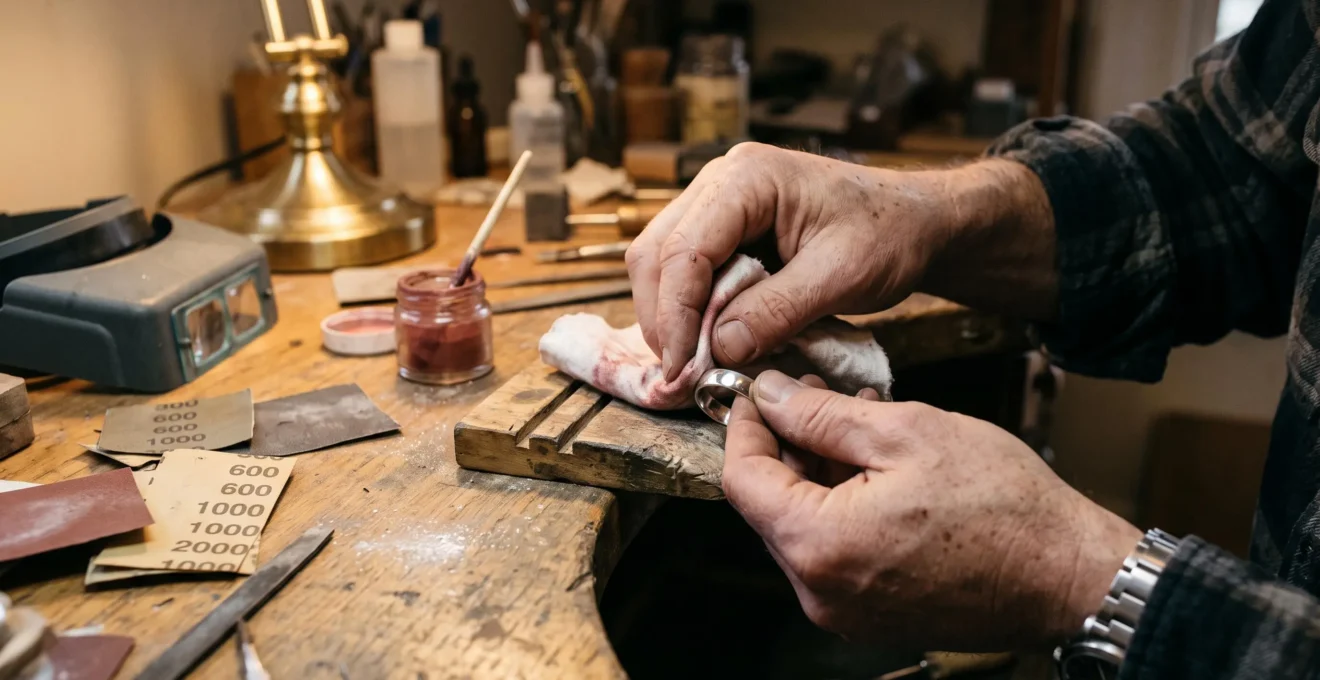
A jeweller-quality mirror finish on silver comes from progressively refining the metal’s surface until scratches become too fine to noticeably scatter reflected light. At home, the process combines careful surface preparation, increasingly fine abrasives, a suitable final polishing compound and meticulous cleaning between stages.
The objective is not simply to make silver brighter. A mirror-polished ring or pendant should reflect nearby objects with sharp, recognisable outlines rather than displaying a hazy glow. Achieving that distinction requires controlling scratches, pressure and contamination instead of repeatedly applying ordinary silver polish.
Plain sterling silver jewellery with accessible surfaces is generally the most practical starting point. Silver plating, antique finishes, gemstones, delicate settings and engraved details introduce risks that can make professional treatment preferable. For an uncomplicated solid-silver piece, however, patient hand polishing can produce an impressive reflective finish without commercial polishing machinery.
Mirror-finish silver polishing: the essentials
- Remove progressively finer scratches before applying a final polishing compound; a finishing cloth cannot conceal deep sanding marks.
- Use clean, separate materials for each abrasive stage and inspect the metal under angled light before proceeding.
- Preserve the finish with gentle cleaning, careful storage and infrequent corrective polishing rather than constant abrasion.
- Why Commercial Silver Polishes Often Dull Mirror Finishes Instead of Enhancing Them
- How Progressive Grit Polishing Creates Mirror Reflectivity From Scratched Silver
- How Professional Jewellers Achieve Glass-Like Mirror Reflectivity
- Rotary Buffing Tools vs Hand Polishing: Speed vs Safety for High Polish
- The Buffing Mistake That Creates Permanent Micro-Scratches on Mirrors
- When to Stop Polishing Before Removing Too Much Precious Metal
- Microfibre Cloths vs Jeweller’s Rouge: Which for Mirror-Finish Maintenance?
- How to Maintain Showroom Polish on Silver Between Professional Services
Why Commercial Silver Polishes Often Dull Mirror Finishes Instead of Enhancing Them
Commercial silver polishes can reduce the clarity of an existing mirror finish because many contain abrasive particles intended to remove tarnish rather than preserve an exceptionally refined surface. Those particles may leave fine scratches that scatter reflected light. The outcome depends on the formulation, polishing cloth and application technique: not every silver polish damages every mirror finish.
The difference becomes apparent when comparing two pieces of equally clean silver. One looks bright but reflects a nearby window as a blurred patch. The other shows the window’s edges distinctly. Both may be free of visible tarnish, yet only the second has the surface refinement associated with high-lustre jewellery.
Silver tarnish consists mainly of silver sulfide formed when silver reacts with sulfur-containing compounds in its environment. Abrasive polishes remove this discoloration by taking away some surface material, potentially including underlying silver.
The Canadian Conservation Institute guidance on silver care and tarnish removal explains that polishing products leave fine scratch patterns and that general-purpose metal polishes are often more abrasive than formulations intended specifically for silver.
Product descriptions such as “deep clean”, “restorer” or “tarnish remover” indicate a cleaning purpose, but they do not reliably establish abrasive particle size or predict how a particular formula will perform on mirror-polished silver. Check the manufacturer’s instructions and suitability for the specific surface rather than relying on marketing terminology.
Chemical silver dips are different. They dissolve tarnish without relying primarily on mechanical abrasion, but they can cause unwanted discoloration, localized surface damage or retained chemicals in hollow areas. Protective additives in some products may also produce uneven long-term results.
For an already reflective piece, begin with the least aggressive compatible cleaning method. Reserve abrasive correction for visible surface defects that gentle cleaning cannot resolve.
Once the finish has acquired genuine scratches, a controlled polishing sequence offers a more predictable route back to reflectivity than repeated applications of an ordinary tarnish remover.
How Progressive Grit Polishing Creates Mirror Reflectivity From Scratched Silver
Progressive grit polishing transforms scratched silver into a reflective surface by replacing deeper scratches with increasingly shallow, finer marks. Every stage must remove the visible damage remaining from the previous abrasive before proceeding. Success depends on thorough preparation, clean abrasives and repeated inspection—not simply on selecting the finest available polishing paper.
A mirror surface does not need to be mathematically free of scratches. Its irregularities must instead be sufficiently small and shallow that they do not significantly disrupt the intended reflection. Scratch depth, distribution and surface texture matter more than making every scratch run in one direction.
Coarse abrasives remove damaged material relatively quickly, but create their own scratches. A finer abrasive then reduces those marks. Skipping directly from a coarse stage to a very fine one can leave deeper defects that the finishing material removes too slowly to be practical.
There is no single validated grit progression appropriate for every silver object. The starting grade depends on the actual damage, alloy, thickness, shape and finish. For a new, uncomplicated sterling-silver practice piece, an illustrative sequence might involve P1000, P1500, P2000 and a compatible finer finishing abrasive. These are examples rather than universal requirements; follow the abrasive manufacturer’s instructions and start finer whenever the surface condition permits.
At each stage, use gentle, even strokes with suitable backing on accessible surfaces. Changing sanding direction between grades can help reveal older scratches: marks crossing the new sanding pattern indicate that the previous stage has not been fully refined.
Inspection is particularly effective under raking light. Hold a flashlight at a low angle to the metal, rotate the piece and watch for scratches that become visible as the reflection moves. Diffuse overhead lighting can conceal imperfections that appear immediately under a narrow angled beam.
Five checks before advancing to a finer abrasive
- Identify the surface. Confirm that the practice piece is suitable solid silver, producing a clear starting assessment of scratches, plating risks and vulnerable details.
- Select the least aggressive effective abrasive. Test an inconspicuous accessible area and record the starting grade.
- Work evenly. Refine the selected area without concentrating pressure on edges, producing a consistent scratch pattern.
- Clean completely. Remove abrasive residue using a fresh suitable cloth or pad, leaving no visible particles from the previous stage.
- Inspect under raking light. Rotate the cleaned piece and confirm that older, deeper scratches are no longer visible before moving finer.
Never treat time spent polishing as proof that a stage is complete. If old scratches remain, progressing prematurely transfers the defect into the finishing process and may require returning to an earlier abrasive.
Once the prepared surface shows consistent fine texture without isolated deep marks, the task changes from correcting damage to developing high lustre—the stage where professional polishing compounds become particularly useful.
How Professional Jewellers Achieve Glass-Like Mirror Reflectivity
Professional jewellers achieve glass-like silver reflectivity by separating surface preparation, preliminary buffing and final high-lustre polishing. Abrasives remove progressively finer scratches, while a final compound such as jeweller’s rouge helps develop the reflective finish. Clean polishing media, controlled pressure and careful inspection are essential throughout, regardless of whether the work is performed by hand or machine.
Professional finishing is a sequence of distinct operations rather than a single application of polishing paste. Preliminary abrasion establishes a uniform surface. An intermediate buffing compound can refine marks remaining after sanding, while rouge is used for the final high-lustre stage.
Traditional red jeweller’s rouge is associated with fine iron-oxide polishing compounds, although commercial products vary in composition and intended use. Other fine polishing formulations may use alumina. The compound acts through a combination of extremely fine abrasive action and surface burnishing, depending on its formulation and application.
The compound is applied sparingly to an appropriate clean support—such as a dedicated cotton buff—rather than smeared heavily across the workpiece. Excessive compound loading can create unnecessary residue and interfere with effective polishing.
As explained in Ganoksin‘s Basic Polishing Technique, preliminary tripoli buffing and final rouge polishing serve different purposes. Their polishing buffs should remain separate because contamination by a coarser compound compromises the final finish.
Home enthusiasts can reproduce the essential finishing principles with a clean, soft cotton polishing cloth and a suitable final compound. Work on small accessible areas using light, consistent pressure, then remove residue and inspect the reflection before deciding whether further polishing is justified.
Cleanliness is especially important when switching compounds. A particle of coarse abrasive embedded in a finishing cloth can drag across the surface and create a fresh scratch. Dedicated cloths, clean hands and a dust-free working area reduce this risk.
Professional jewellers also treat different parts of a piece selectively. Engravings, intentional darkened recesses, decorative textures and delicate settings may be protected or finished separately. Aggressive mirror polishing across these features can soften their outlines or remove intentional contrast.
Heat deserves attention during powered work. Friction can raise the temperature of the jewellery, while concentrated polishing pressure can round edges or distort fine detail. These risks exist independently of the visual quality of the final reflection.
A clean, carefully prepared sterling-silver surface can reach impressive lustre with hand polishing alone. Powered equipment may make some operations more efficient, but it also introduces hazards that must be assessed separately from polishing quality.
Rotary Buffing Tools vs Hand Polishing: Speed vs Safety for High Polish
Rotary polishing tools can refine accessible silver surfaces efficiently, but hand polishing provides greater tactile control and avoids the entanglement hazards of a rotating wheel. Neither approach is universally superior. The safer choice depends on jewellery shape, construction, operator experience and the ability to secure and control the workpiece without damaging its details.
A rotary tool concentrates polishing action within a moving contact area. That can accelerate finishing on suitable broad surfaces, but it can also concentrate abrasion near edges, engraved details or changes in curvature.
Hand polishing generally works more slowly, yet makes it easier to reduce pressure immediately and monitor the developing reflection. It is particularly useful for uncomplicated repairs on small areas where powered polishing would provide little practical advantage.
The comparison is clearest when matched to the piece itself:
| Consideration | Hand polishing | Rotary polishing |
|---|---|---|
| Surface control | Fine control through direct pressure and movement | Requires careful control of contact and workpiece position |
| Broad, accessible surfaces | Suitable but potentially time-consuming | Can be efficient with appropriate equipment and experience |
| Engravings and delicate edges | Generally easier to treat selectively | Greater risk of rounding or unwanted material removal |
| Heat | Usually easier to manage during light polishing | Friction can cause concentrated heating |
| Mechanical hazards | No powered-wheel entanglement | Requires protection from catching, entanglement and flying objects |
Rotary polishing is not simply hand polishing performed faster. Rotating wheels can catch chains, pendants or unsupported edges and pull them unexpectedly. An OSHA accident report involving a jewellery-polishing wheel documents a 2006 workplace incident in which a necklace chain became entangled in rotating equipment, resulting in a fingertip amputation. That individual case illustrates the mechanical danger without establishing how frequently such injuries occur.
Documented jewellery-wheel entanglement incident
On March 22, 2006, a worker polishing a gold necklace experienced an equipment-related entanglement when its chain caught in the rotating axle of a polishing wheel.
The incident caused a serious fingertip injury requiring hospitalisation. Although the jewellery was gold and the equipment was a workplace machine, the report demonstrates why flexible chains and small components are hazardous around rotating polishing assemblies.
For suitable powered-polishing tasks, follow the equipment manufacturer’s operating instructions, including its approved speed range and accessories. Use appropriate eye protection, effective dust control and secure handling. Keep hair and loose clothing away from rotating parts, and avoid polishing loose chains or pieces that can catch or cannot be held safely.
Maintain controlled movement rather than holding the wheel against a single point. Stop the machine and allow it to come fully to rest before inspecting or repositioning the workpiece. Never touch a moving wheel or rely on touching the jewellery to assess its temperature while the tool is operating.
For antique, thin-walled, engraved or highly valuable silver, a professional assessment is preferable to experimenting with rotary equipment. Even a technically successful polish may permanently change details that give the piece its character.
The Buffing Mistake That Creates Permanent Micro-Scratches on Mirrors
One of the most damaging polishing mistakes is reusing a cloth or buff contaminated with coarser abrasive particles. These particles can produce fresh scratches while the surrounding fine polishing compound develops shine. The resulting defects cannot simply be wiped away: correcting them requires removing enough surface material to level the damaged area.
Consider a hypothetical polishing session in which a cotton cloth is used first with an intermediate abrasive and then with rouge. Even if fresh rouge is added, particles trapped in the cloth may remain active and scratch the silver during final finishing.
The result can be frustratingly deceptive. The surface grows brighter overall, but under angled light it displays isolated lines or a cloudy network of fine marks. Additional polishing with the same contaminated cloth can worsen the damage rather than correct it.
Every abrasive grade needs its own clean polishing support. Cloths and buffing wheels should be labelled or otherwise clearly separated so that coarse and finishing compounds never share the same material.
The Canadian Conservation Institute also warns that dried polishing compounds can form larger abrasive aggregates. This means an otherwise appropriate fine polish can become problematic if old material is allowed to harden and is then dragged across a delicate surface.
Domestic dust is another potential source of contamination. Dust can contain hard mineral particles, so wiping a mirror-polished surface with a dusty cloth risks introducing unintended abrasion. Clean the workbench and allow airborne dust to settle before beginning precision finishing.
A practical prevention routine involves:
- Keeping separate cloths or buffing accessories for preparation, intermediate polishing and final rouge.
- Storing each finishing material in a clean, closed container.
- Inspecting cloths for embedded particles, hardened compound and damaged seams before use.
- Cleaning reusable, washable materials according to their manufacturer’s instructions and avoiding fabric softeners that may leave residue.
- Discarding or replacing polishing media that cannot be reliably cleaned.
Even the best storage discipline cannot eliminate every particle. If an unexpected scratch appears, stop immediately, clean the workpiece and identify the likely contamination before continuing.
Because removing a new scratch means removing additional metal, contamination control also helps preserve the long-term thickness and detail of the jewellery. That makes knowing when to stop polishing equally important.
When to Stop Polishing Before Removing Too Much Precious Metal
Stop polishing when the desired reflection is achieved, when further work produces little visible improvement, or immediately when signs of metal loss or detail distortion appear. Every abrasive pass removes some surface material. Repeated polishing is particularly risky on silver-plated objects, thin edges, hallmarks and decorative features where lost metal cannot be restored by additional polishing.
The distinction between sterling silver and silver plating is fundamental. Sterling silver is a silver alloy throughout the relevant section, while a silver-plated object has a surface layer of silver over another material. Removing enough plating can expose the substrate and make a simple polishing project a restoration problem.
Hallmarks can help identify a piece, but marks alone are not universally conclusive. Weight and magnetic response may provide clues about construction, yet neither establishes silver content reliably. If the material is uncertain, a qualified jeweller can assess it using appropriate testing methods.
The Canadian Conservation Institute’s technical note on precipitated calcium carbonate polishing explains that abrasive polishing removes underlying silver even after tarnish has disappeared. It also warns that repeated treatment can erase fine decoration or reveal the metal underneath silver plating.
Three practical warning signs deserve particular attention:
- Softening edges or details: once-sharp engraving, relief or stamped features begin to lose definition.
- Changes in underlying colour: an area on a plated object develops an appearance suggesting possible exposure of the substrate.
- Persistent local defects: scratches or matte areas remain despite careful refinement, suggesting that further material removal may be required to eliminate them.
A remaining matte patch is not, by itself, proof of excessive polishing. It can also indicate incomplete scratch refinement, different surface conditions or a contaminating residue. The appropriate response is to investigate rather than increase pressure automatically.
Dark residue on a polishing cloth is similarly misleading. Silver itself can contribute to dark polishing residue, so a blackening cloth does not establish that tarnish remains or that another abrasive pass is necessary.
Define the desired result before starting: for example, a clear reflection across the accessible outer face of a solid-silver pendant without reducing stamped details. If that result has been reached, the finishing process should end even if further polishing might produce a marginal improvement under magnification.
Minor imperfections may be preferable to permanently altered geometry. Once the finish is satisfactory, continued improvement should come primarily from better cleaning and storage—not additional abrasion.
Microfibre Cloths vs Jeweller’s Rouge: Which for Mirror-Finish Maintenance?
Use a clean, soft, non-impregnated microfibre cloth for routine removal of fingerprints and superficial residues from mirror-finished silver. Reserve jeweller’s rouge for occasional corrective polishing when fine surface marks have reduced reflectivity. Microfibre primarily cleans the surface, whereas rouge changes it through polishing action, making the two materials suitable for different maintenance situations.
A high-quality microfibre cloth collects skin oils and loose particles without the deliberate abrasive action of a polishing compound. However, it is not automatically scratch-proof: embedded dust, damaged stitching or an unsuitable cleaning technique can still mark polished silver.
Jeweller’s rouge performs a different function. Used with compatible soft polishing material, it helps refine extremely fine surface marks. This may restore brilliance that ordinary cleaning cannot recover, but repeated use unnecessarily removes some material.
Confusion often arises with commercial silver-polishing cloths. Some are impregnated with polishing agents or tarnish-removing chemicals, so they should not be treated as equivalent to plain microfibre. Their intended use depends on the particular formulation.
For daily care, choose a soft, clean jewellery-safe cloth without rough seams or embedded dirt. Gently remove fingerprints after wearing, using minimal pressure. If moisture is needed and the piece’s construction permits it, use a compatible slightly damp cloth and dry the surface thoroughly afterward.
The distinction can be summarised by purpose:
| Situation | Plain microfibre | Jeweller’s rouge |
|---|---|---|
| Fingerprints and skin oils | Preferred routine option | Unnecessary |
| Light superficial residue | Suitable when clean and compatible | Usually unnecessary |
| Fine scratches affecting reflection | Cannot remove actual scratches | May help refine minor defects |
| Silver plating or delicate details | Gentle cleaning may be appropriate | Avoid without specialist assessment |
| Routine frequent use | Appropriate with careful technique | Not recommended |
Choice of rouge support matters too. Soft cotton is commonly used for final finishing, while different felt or buff constructions can produce different contact pressures and polishing effects. A firmer support should not automatically be assumed to create a better mirror surface.
When a dull patch remains after gentle cleaning, inspect it under angled light before reaching for compound. Tarnish, fine scratches and leftover product films require different responses.
With the appropriate cleaning method established, environmental protection becomes the most effective next step. Preventing tarnish and handling damage reduces the frequency of abrasive work altogether.
Key takeaways before long-term care
- Preserve the metal: repeated polishing removes material even when visible tarnish has already disappeared.
- Preserve the reflection: clean, separate finishing materials prevent unwanted scratches during routine handling.
- Preserve the conditions: protected storage and reduced exposure to tarnish-promoting substances can extend the time between corrective treatments.
How to Maintain Showroom Polish on Silver Between Professional Services
Maintaining showroom-quality silver begins with preventing tarnish, abrasion and residue buildup rather than repeatedly restoring the surface with polishing compounds. Gentle cleaning after handling, individual protective storage and periodic visual inspection can preserve reflectivity. Professional polishing becomes appropriate when visible scratches, complicated construction or fragile details make further home treatment risky.
Silver tarnishes mainly through reactions involving sulfur-containing compounds. Sources of exposure can include polluted air, certain packaging materials and substances encountered during everyday wear. Perspiration, perfume residue and unsuitable cleaning products can contribute to surface changes or accelerate the need for cleaning.
Storage therefore matters as much as polishing technique. Individual soft pouches or suitable clean polyethylene bags can reduce contact and limit exposure. Compatible anti-tarnish materials may offer additional protection, provided they do not touch sensitive components in an unsuitable way.
The Canadian Conservation Institute recommends preventive storage approaches that can include sealed polyethylene, suitable sulfur-absorbing materials, acid-free tissue and environmental moisture management for appropriate silver objects.
For ordinary silver jewellery, a workable storage arrangement separates each piece from neighbouring objects, keeps abrasive surfaces away from the finish and avoids materials known to release tarnish-promoting substances. Anti-tarnish pouches or compatible storage inserts may be helpful, but the condition and composition of the jewellery should guide the choice.
A practical ongoing routine has three parts:
- After wearing: gently remove fingerprints and surface oils with a clean, soft cloth before returning the jewellery to storage.
- During storage: keep pieces separated, protected from unnecessary humidity and away from household chemicals or potentially reactive materials.
- At periodic inspections: examine the reflection under consistent lighting, checking for tarnish, haze, scratches and changes near settings or edges.
Early tarnish can sometimes be addressed with a compatible gentle cleaning method. However, dark tarnish does not automatically require aggressive abrasion; treatment should depend on the object’s condition and construction. Silver with glued components, porous gemstones, pearls or moisture-sensitive details may require restrictions that do not apply to plain metal.
Professional intervention becomes sensible when the reflective surface shows widespread scratches that gentle care cannot address, when plating is suspected, or when polishing would involve stone settings, engraving or unusual decorative finishes.
There is no universal schedule for professional repolishing. A frequently worn plain sterling-silver ring may experience different wear from a pendant kept in protected storage. Assess the actual surface condition rather than arranging abrasive polishing at fixed intervals.
Begin with one plain, confirmed solid-silver item, establish a clean storage space and inspect its reflection under angled light. This simple baseline makes it easier to maintain the finish—and to recognise when professional attention is the better choice.
Can sterling silver achieve a true mirror finish without a polishing machine?
Yes. Suitable sterling silver can develop a highly reflective finish through careful hand preparation and fine polishing compounds. The quality depends on the starting surface, scratch refinement and cleanliness of the polishing materials. Hand polishing may require more effort than a suitable powered process, particularly on larger surfaces.
Can toothpaste replace jeweller’s rouge for polishing silver?
Toothpaste is not a reliable substitute for a known jewellery-finishing compound. Its abrasive properties vary between formulations, and ingredients intended for dental cleaning are not selected to preserve a mirror-polished metal surface. Use a polishing product specifically suitable for the silver finish instead.
Why does silver still look cloudy after polishing with rouge?
Cloudiness may result from scratches left by earlier abrasives, contaminated polishing materials, remaining compound residue or uneven surface preparation. Clean the piece first and inspect it under raking light. If deeper scratches remain visible, additional rouge alone may not correct them; an earlier refinement stage may be necessary.
Should silver-plated jewellery be polished to a mirror finish at home?
Abrasive mirror polishing is generally a poor choice for silver plating unless its condition and thickness have been professionally assessed. The surface silver layer can be worn through, exposing the base metal. Gentle compatible cleaning is safer for routine care, while a jeweller should assess significant scratches or damaged plating.
Does a mirror-polished silver surface resist tarnish better than ordinary polished silver?
A mirror finish does not make silver immune to tarnishing. Sulfur-containing environmental substances can still react with the metal. Surface condition may influence how discoloration appears, but protective storage, reduced exposure and gentle maintenance remain important regardless of the initial polish quality.