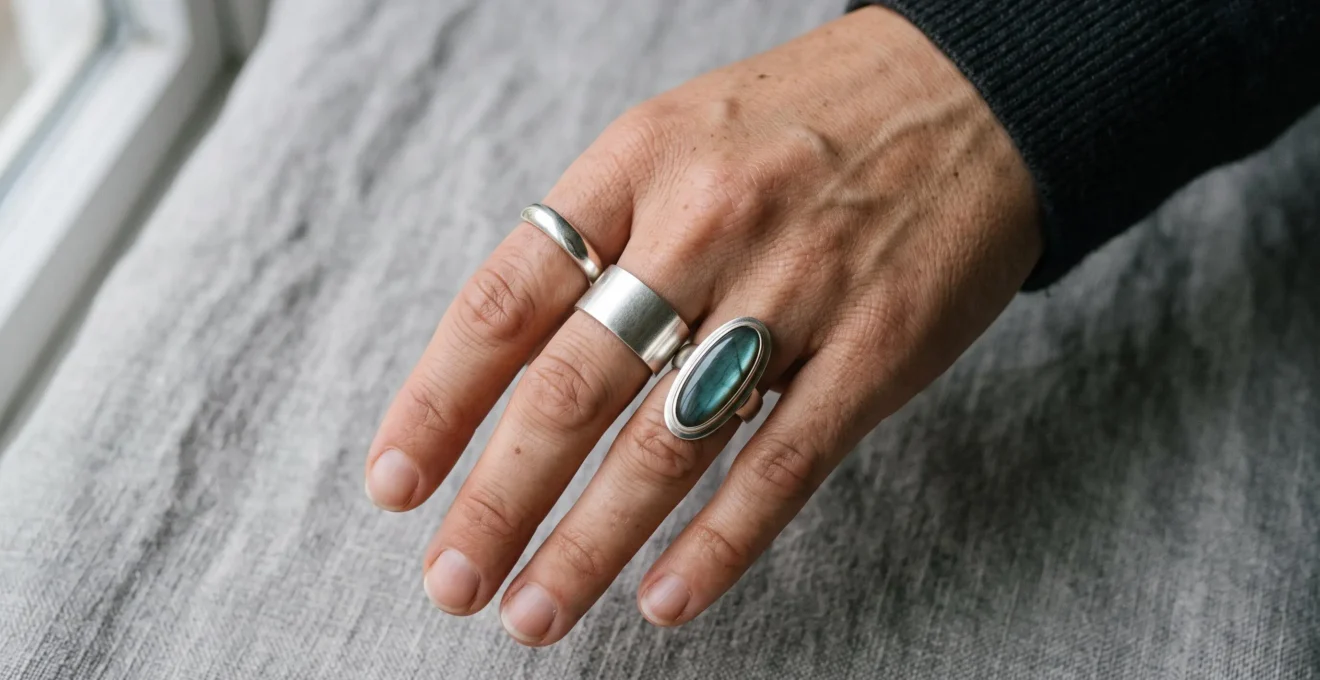
The most flattering ring silhouette depends less on hand size alone than on the relationship between finger length, width, knuckle shape and the ring’s visible proportions. Short fingers often benefit from elongated gemstones and restrained band widths, while long fingers can comfortably carry broader bands and substantial settings. Wide hands may suit designs with greater visual presence, whereas narrow hands often look balanced with carefully scaled details.
These are styling principles, not fixed rules about attractiveness. A ring should complement the wearer’s preferred appearance, remain comfortable and sit securely through normal movement. Stone orientation, band curvature, setting height and metal finish all influence the impression created, sometimes more than the gemstone’s actual size.
The practical approach is to compare complete silhouettes on the hand, rather than judging individual rings in isolation. A design that appears elegant in a jewellery display may create a very different visual effect when worn.
Ring silhouettes and hand proportions at a glance
- Short fingers: Consider north-south oval, marquise or pear-shaped stones with relatively slim bands to encourage a lengthwise visual line.
- Long fingers: Wider bands, rounded settings and substantial gemstones can create appealing balance without needing additional elongation.
- Wide knuckles or hands: Prioritise comfortable knuckle clearance, appropriate band proportions and a setting that remains stable on the finger.
- Finish matters: Polished and brushed metals create different levels of reflection and visual emphasis, particularly in photographs.
- Why Dome-Shaped Ring Bands Make Fingers Appear Shorter and Fuller
- Vertical Detailing vs Horizontal Bands: Which Elongates Short Fingers?
- How to Calculate Optimal Ring Width for Your Finger Length and Knuckle Size
- The Silhouette Mistake That Emphasises Wide Knuckles Instead of Masking Them
- When to Purchase Rings: Accounting for Seasonal Finger Swelling Patterns
- Sharp Angles vs Rounded Profiles: Which Flatters Different Face Shapes?
- High Polish vs Brushed Finish: Which Flatters Cool vs Warm Skin Tones?
- How to Choose Silver That Photographs Brilliantly for Social Media
Why Dome-Shaped Ring Bands Make Fingers Appear Shorter and Fuller
Dome-shaped ring bands can make fingers appear fuller because their rounded surfaces introduce visible volume across the finger. The effect is often attractive on long, slender fingers, but a broad dome may overwhelm shorter proportions. Dome height, actual band width and edge definition all influence the result; a gently rounded, narrow band can still flatter short fingers.
A domed or half-round band has a curved outer surface rather than a uniformly flat profile. Light travels across that curvature in a gradual highlight, emphasising the band’s rounded volume. On a narrow finger, a pronounced dome may consequently appear substantial even when the ring is not exceptionally wide.
However, dome height and band width are independent measurements. A high dome rises noticeably above the finger, while a low dome maintains a gentler contour. Either profile can be manufactured in different widths. For someone with short fingers, a low, softly rounded band with restrained edges may offer a more delicate appearance than a tall, broad dome.
Flat bands and knife-edge designs offer useful comparisons. A flat band with sharply defined edges creates a distinct transverse boundary across the finger. A knife-edge profile introduces a central ridge that reflects light differently and can give a more directional impression. Neither guarantees elongation: the actual width, proportions and surrounding setting remain decisive.
It would therefore be misleading to claim that doming alone shortens fingers or that a horizontal edge is always responsible for a shortening effect. These are qualitative visual impressions, not experimentally established optical laws.
A simple comparison helps. Try a domed band and a flat band of similar width on the same finger, then photograph both from directly above in diffuse daylight. Keep the camera distance, finger position and lighting consistent. Look at how much of the visible finger each band occupies and whether its contour attracts attention across or along the finger.
For long, narrow fingers, a pronounced dome can introduce welcome fullness. For shorter fingers, retaining the comfort of a rounded surface while reducing visual bulk may produce a more balanced result.
Vertical Detailing vs Horizontal Bands: Which Elongates Short Fingers?
Vertical detailing generally creates a stronger impression of length on short fingers than broad horizontal elements. North-south oval, marquise, pear and elongated rectangular gemstones direct attention along the finger, while wide bands and east-west settings emphasise its width. The most flattering choice preserves balance between stone length, band width and the wearer’s overall hand proportions.
The key distinction is the direction in which a ring guides the observer’s attention. An elongated gemstone positioned parallel to the finger establishes a continuous lengthwise axis. A broad band or horizontally oriented centre stone instead establishes a more prominent crosswise element.
The Gemological Institute of America identifies oval, marquise, pear and rectangular diamonds among the shapes that can accentuate shorter fingers. Its recommendations for engagement ring styles and finger proportions also emphasise the importance of balancing the entire setting with the hand.
Consider the directional differences between popular silhouettes:
| Design element | Typical visual emphasis | Proportions to consider |
|---|---|---|
| North-south oval or marquise | Lengthwise movement | Short or moderately proportioned fingers |
| East-west elongated gemstone | Crosswise movement | Long fingers seeking visual width |
| Wide flat band | Strong horizontal presence | Long fingers or broader hands |
| Vertical baguette arrangement | Lengthwise rhythm | Short fingers when the design remains proportionate |
| Split shank with a large centre stone | Combined lengthwise and crosswise emphasis | Hands able to accommodate greater visual complexity |
Setting construction can modify the impression. A raised prong setting exposes more of a stone’s outline and introduces depth, while a bezel surrounds the gemstone with metal and may broaden its overall footprint. Four-prong settings can leave corners or sides relatively open, although prong count alone does not determine apparent finger length.
Similarly, an elongated centre stone does not automatically make an entire ring look slender. Split shanks, substantial pavé shoulders and broad galleries can introduce enough extra width to change the visual balance.
Excessive elongation also creates trade-offs. An unusually long stone may dominate a very slim finger, while a tall, exposed setting may catch on clothing during daily wear. Long fingers, conversely, may benefit from the horizontal emphasis of an east-west setting or wider band.
The best elongating design is therefore not necessarily the longest stone available. It is one that introduces a clear vertical impression while maintaining comfortable scale, secure construction and visual harmony.
How to Calculate Optimal Ring Width for Your Finger Length and Knuckle Size
There is no validated universal formula for calculating ideal ring width from finger length and knuckle size. A practical method is to measure both dimensions, compare several band widths on the hand and assess comfort separately. Short fingers often suit visually restrained widths, while prominent knuckles require particular attention to clearance and ring stability.
Begin by identifying two reference measurements: the visible length of the finger from its base crease towards the knuckle, and the approximate width across the broadest part of that knuckle. These describe hand proportions, not the ring size needed to pass over the joint.
For a simple styling comparison, the ratio of finger length to knuckle width may be written as:
Proportion ratio = visible finger length ÷ knuckle width.
This ratio is descriptive rather than prescriptive. It cannot reliably generate an optimal band width, and there is no established threshold that makes a particular width universally flattering.
As an explicitly hypothetical example, a finger with a measured length of 45 mm and knuckle width of 18 mm has a ratio of 2.5. That number simply records the relative proportions. The wearer must still compare actual rings to determine which design looks balanced and fits comfortably.
Band width presents two different constraints. Very broad bands may cover a substantial portion of a short finger and interfere with bending. Conversely, a particularly narrow or sharply edged band may feel uncomfortable on a fuller finger, depending on its cross-section and fit.
The GIA’s ring-sizing and fitting guidance recommends professional sizing instruments and highlights the special considerations associated with wider bands. Bridal ring combinations wider than 4 or 5 mm can require additional fitting attention. This measurement is a practical sizing consideration, not an aesthetic boundary.
A paper strip can provide an approximate home reference, but it should not replace professional sizing. Paper tension, positioning and measurement errors can produce inaccurate circumferences. A jeweller can assess the finger base and knuckle with suitable gauges, including the effect of the proposed band’s width.
Prominent knuckles introduce another issue: a ring must pass over the joint without becoming excessively loose at the finger base. Simply choosing a larger size may cause the ring to rotate. Depending on the design, a jeweller may recommend sizing beads, suitable half sizes or a mechanical or hinged shank.
Five steps to select and verify a flattering ring width
- Record your finger proportions: Measure the visible finger length and approximate knuckle width. Keep the two measurements together as a reference.
- Compare physical band widths: Try several bands of different widths and photograph each in the same position. Save a labelled comparison.
- Assess movement: Bend the finger, close the hand gently and check for uncomfortable pressure. Record any width that restricts movement.
- Verify the actual ring size: Ask a jeweller to measure both knuckle clearance and base fit using professional gauges. Obtain the recommended size for the chosen width.
- Confirm the complete silhouette: Test the proposed stone, profile and finish in the final width, then retain a photograph and fitting notes before ordering.
Metal finish and colour also influence perceived mass. A mirror-polished band can create sharper highlights than a softly brushed surface of identical width, making side-by-side visual testing more informative than dimensions alone.
The optimal width is ultimately the one that combines the desired appearance with joint clearance, stable positioning and comfortable movement. Measurements guide comparison, but cannot replace trying on the design.
The Silhouette Mistake That Emphasises Wide Knuckles Instead of Masking Them
A common styling mistake with prominent knuckles is choosing an oversized, attention-grabbing ring solely to conceal them. Large stones, heavy ornamentation and abrupt changes in band width may instead increase visual emphasis around the joint. A more coherent silhouette generally uses carefully positioned detail, smooth transitions and a fit suited to the difference between knuckle and finger-base dimensions.
Wide knuckles can arise from ordinary bone structure, and their prominence does not necessarily need disguising. For someone who prefers a more continuous visual line, however, the placement of the ring’s focal point matters.
An oversized decorative element near the knuckle can compete with its outline. Rather than covering the joint, consider a setting whose centre of visual attention rests naturally over the finger base. A relatively low-profile design may also introduce less apparent bulk than an elevated, heavily ornamented setting.
A medium-width band with smooth shoulders can visually connect the setting to the finger without creating an abrupt transition. The exact result will vary with knuckle size, finger taper and the ring’s orientation.
There is an important distinction between naturally prominent bone structure and changing joint swelling. The latter may be associated with a medical condition rather than simply with hand shape.
The UK’s National Health Service describes joint pain, stiffness and swelling as common arthritis symptoms. Its information on arthritis and joint swelling explains that symptoms can affect the hands and may fluctuate during flare-ups.
When joint dimensions vary, comfortable fitting takes precedence over attempts to mask their appearance. Sizing beads or specialist shanks may help in selected situations, but their suitability depends on the ring and the wearer. New, severe or unexplained joint swelling warrants medical assessment rather than a purely jewellery-related adjustment.
Before buying, examine the ring with the hand resting naturally at waist height. Relax the fingers, rotate the wrist slightly and observe the relationship between the setting, finger base and knuckle. This reveals proportions that may look different when the hand is fully extended for a display photograph.
Also check whether the ring turns towards one side or moves excessively after passing over the knuckle. A beautiful setting that constantly rotates may lose the balanced orientation for which it was chosen.
Choosing a ring to complement wide knuckles should never require concealing natural anatomy at the expense of comfort. A balanced setting can celebrate the hand’s proportions while remaining practical for everyday wear.
When to Purchase Rings: Accounting for Seasonal Finger Swelling Patterns
Ring sizing should account for changing finger dimensions rather than rely on a particular purchase month. Fingers commonly become smaller in cold conditions and fuller in warmth, while activity, time of day and other individual factors can affect measurements. The safest approach is to compare repeated measurements under typical conditions and choose a fit that accommodates normal variation.
Temperature influences circulation and soft-tissue volume. Warm conditions can encourage vascular expansion and swelling, while cold conditions can temporarily reduce finger dimensions. A ring that feels comfortably snug during winter may consequently become restrictive in summer.
Other possible influences include exercise, sodium intake, pregnancy, altitude and daily fluctuations. Their effects differ between individuals, so no single adjustment applies to everyone.
Rather than assuming that one season is the ideal time to purchase a ring, consider how consistently it fits throughout an ordinary day. Measuring towards the end of the day at a comfortable body temperature can be useful, especially when compared with additional measurements taken on other occasions.
For an expensive engagement ring or a piece intended for daily wear, a fitting record from different conditions can help identify the usual range of variation. A jeweller can then decide whether the ring’s shape, width or internal fitting features require adjustment.
The largest recorded measurement should not automatically become the final ring size. An isolated swollen measurement may produce a ring that slides or spins during more typical conditions. Equally, choosing a very tight size based on cold fingers may create problems when swelling occurs.
A practical fitting test should confirm that the ring passes the knuckle without excessive force, settles comfortably at the finger base and does not slip off easily. When fingers are cold, a secure ring may feel slightly looser without necessarily being incorrectly sized.
For significant differences between knuckle width and finger-base circumference, professional options may include sizing beads, specialist adjustable mechanisms or alterations that depend on the ring’s construction. Repeated resizing is not always the best response to ordinary temporary changes.
Seasonal fit also affects aesthetics. A ring that rotates exposes a different part of the setting, disrupting the intended vertical or horizontal line. An excessively tight band may create visible pressure around the finger, changing the smooth silhouette originally selected.
Purchase timing matters less than collecting representative measurements and obtaining professional fitting advice. A ring designed for everyday variation will preserve its intended appearance more reliably than one sized from a single unusually hot or cold moment.
Sharp Angles vs Rounded Profiles: Which Flatters Different Face Shapes?
Angular and rounded ring profiles create different stylistic impressions, but face shape is usually a secondary consideration when choosing jewellery worn on the hands. Angular gemstones can echo defined facial or hand features, while rounded designs can introduce softness or contrast. Neither approach is inherently superior; finger proportions, personal style and the ring’s scale deserve priority.
The relationship between facial geometry and ring design is indirect. Unlike earrings or necklaces, rings do not frame the face in ordinary conversation. Their visual connection becomes more relevant in close-up portraits, photographs featuring hands near the face, video calls or deliberately coordinated accessory styling.
Geometric gemstones such as princess cuts, emerald cuts and baguettes introduce straight edges, corners and orderly outlines. These may appeal to someone who prefers similarly defined features in their wider personal style.
Oval, cushion and circular settings introduce smoother transitions. Their softer outlines can either echo rounded facial features or provide contrast to angular ones.
Two different styling approaches are therefore equally defensible:
- Geometric harmony: Repeat angular or rounded shapes across jewellery, nails and other accessories to create a coherent appearance.
- Geometric contrast: Combine an angular stone with softer features, or a rounded stone with more defined hand contours, to introduce variety.
Hand proportions should resolve conflicts between these approaches. For example, someone with a round face and short fingers may prefer the elongating appearance of a north-south oval rather than a wide circular setting. The oval retains a gentle outline while offering a stronger lengthwise emphasis.
Nail shape provides another practical cue. A wearer who consistently prefers almond nails may also enjoy elongated oval or marquise gemstones. Someone drawn to square nails might appreciate princess or rectangular settings. This is a preference-based styling observation, not an anatomical rule.
The relationship becomes especially useful with substantial signet rings and cocktail rings. Because these pieces occupy more visual space, their geometric outlines are easier to perceive and coordinate with other accessories.
For a delicate everyday band, however, face shape is unlikely to provide meaningful guidance. Comfort, hand proportions and the overall design will usually have more immediate consequences.
The most coherent result often comes from prioritising the hand where the ring actually sits, then using earrings, eyewear or other accessories to create any desired connection with facial features.
High Polish vs Brushed Finish: Which Flatters Cool vs Warm Skin Tones?
High-polish and brushed silver differ primarily in how they reflect light, not in which skin undertones they universally flatter. Polished silver creates strong highlights and reflects surrounding colours, while brushed silver produces softer, more diffuse reflections. Warm or cool undertones can influence personal preference, but lighting, ring proportions and maintenance needs are equally important.
Silver naturally has a cool-toned appearance. Against some complexions, its reflective surface can create noticeable contrast; against others, it appears more blended. This visual relationship changes with daylight, artificial illumination, surrounding clothing and the metal’s condition.
High-polish finishes behave much like small mirrors. Their reflections may include warm walls, cool windows or coloured garments, so the same ring can appear subtly different between locations.
Brushed silver has a textured surface that scatters reflections. It tends to communicate the metal’s overall tone through a softer, less sharply defined sheen. This can appeal to someone who finds mirror-polished jewellery too visually dominant.
Warm-toned skin does not require avoiding silver. A brushed or lightly antiqued finish, warmer gemstone colours or mixed-metal details can change the overall impression without replacing silver altogether. Cool-toned skin likewise does not impose a particular finish.
Finish selection also interacts with width. A broad polished band can create prominent highlights and visible boundaries, while the same width in a brushed finish may appear quieter. This is an aesthetic tendency rather than a measurable guarantee that textured rings look slimmer.
Long-term wear is another important consideration:
| Consideration | High-polish silver | Brushed silver |
|---|---|---|
| Light reflection | Sharp, mirror-like highlights | Soft, diffused highlights |
| Visual emphasis | Draws attention to contours and reflective surfaces | Creates a more subdued appearance |
| Fingerprints | Often readily visible | Generally less prominent |
| Everyday marks | Fine scratches may interrupt the polish | Scratches may blend with the texture or disrupt its pattern |
| Maintenance | Polishing may restore shine, depending on the piece | Consistent texture may require professional refinishing |
Brushed finishes are not necessarily more durable; they simply reveal wear differently. Restoring an even directional texture may require refinishing more than the visibly damaged spot, while repeated polishing can gradually alter fine details on some designs.
When comparing finishes, try otherwise similar rings under more than one lighting condition. Observe both the metal’s colour impression and the apparent width of the finished band.
Skin undertone can inform a choice, but it should never override a finish the wearer enjoys. Visual harmony emerges from the complete combination of skin, metal, gemstone, lighting and design.
Key takeaways before photographing your ring
- A reflective silver finish can appear dramatically different under direct light and diffuse light, even when the ring itself remains unchanged.
- Camera angle and consistent positioning matter when comparing band width, gemstone orientation and ring proportions.
- Accurate colour representation is more useful than aggressive editing, particularly when photographs influence a purchase decision.
How to Choose Silver That Photographs Brilliantly for Social Media
Silver rings generally photograph best under controlled, diffused lighting with limited distracting reflections. Place the ring against a neutral background, use consistent light colour and adjust the camera angle until the metal’s contour is clear. The most useful photograph represents the ring accurately rather than exaggerating brightness, gemstone colour or apparent dimensions.
Highly polished silver reflects its surroundings, including windows, nearby objects and potentially the photographer. This can create unwanted dark areas, irregular highlights or the illusion of uneven metalwork. A ring that looks flawless to the eye may therefore appear surprisingly dull or distorted in a close-up image.
The GIA’s technical guidance on photographing gems and jewellery explains why highly polished metal can be difficult to capture under direct lighting. Diffusion, controlled reflections and careful background selection can help reveal surface details without harsh glare.
Start near a window with indirect daylight. If the light produces a bright white hotspot, move the ring or soften the illumination with a suitable translucent diffuser. Avoid mixing strongly different light colours, such as cool daylight and warm artificial lighting, where accurate metal colour is important.
A matte grey or neutral background provides a useful starting point because it is less likely than a highly saturated surface to introduce distracting colour into silver reflections. However, backgrounds should ultimately be chosen according to the jewellery’s appearance and the intended composition.
Camera position is particularly important when the photograph is intended to demonstrate flattering hand proportions. A directly overhead view may make the outline of a gemstone easy to compare, but it reveals less about setting height. A second image from a modest angle can show how a domed band or elevated stone projects above the finger.
Keep the phone stable, focus on the ring and adjust exposure to retain detail in bright metal surfaces. Exposure lock can help maintain consistency between comparison photographs, although the appropriate exposure point depends on the composition and lighting.
Close-up images also reveal scratches, dust and fingerprints that are easy to miss in ordinary viewing. Cleaning the ring appropriately before photography and checking the surface under diffuse light can improve the result without digital alteration.
Polished and brushed rings respond differently to camera angles. Strong reflections may obscure the contour of a domed design, while directional brushing or defined edges can remain visible under some lighting conditions. These outcomes depend on the setup rather than on a universal photographic advantage for one finish.
When editing, distinguish correcting a colour cast from changing the product’s colour. Accurate white balance and moderate exposure adjustments can improve fidelity. Excessive saturation or artificial warmth may instead make silver appear yellowish, bluish or unusually grey.
For personal posts, multiple angles tell a more complete visual story. For purchasing, reviewing or selling jewellery, maintaining accurate colour and realistic scale is especially important.
Before choosing a significant ring, photograph the preferred design on your hand in diffuse daylight from above and at a slight angle. Compare those images with the experience of wearing it naturally, then make the final decision based on both appearance and comfort.
Can short fingers wear wide statement rings?
Yes. Wide statement rings can look appealing on short fingers, especially when the design has a balanced outline and leaves enough room for comfortable movement. A broad band may reduce the visible length of the finger, but this is a stylistic effect rather than a reason to avoid it. Compare the ring from above and with the hand relaxed before deciding.
Are oval engagement rings always more flattering than round diamonds?
No. A north-south oval may create a stronger impression of length, particularly on short fingers, but round diamonds can offer attractive symmetry on many hand shapes. Stone proportions, band width and setting style influence the complete silhouette. Personal preference remains an essential part of choosing a flattering ring.
Should an engagement ring and wedding band have matching widths?
Matching widths can create a consistent appearance, but they are not essential. Contrasting widths may help distinguish the two rings or balance a substantial engagement-ring setting. What matters is how the combined bands sit on the finger, whether they interfere with one another and whether their total width remains comfortable.
What if a ring fits over the knuckle but spins at the finger base?
This can happen when the knuckle is noticeably wider than the finger base. A jeweller can evaluate whether sizing beads, an alternative shank construction or another fitting adjustment would improve stability. Simply choosing a much smaller size may prevent the ring from passing comfortably over the joint.
Does silver jewellery need a different size from gold jewellery?
Ring size is primarily determined by the finger’s dimensions and the ring’s internal measurements, not by whether the metal is silver or gold. However, two rings marked with the same nominal size can feel different because of band width, interior shape, construction and manufacturing tolerances. Professional fitting with a band similar to the intended design is the most reliable approach.